Need help with booking? Send us a message.
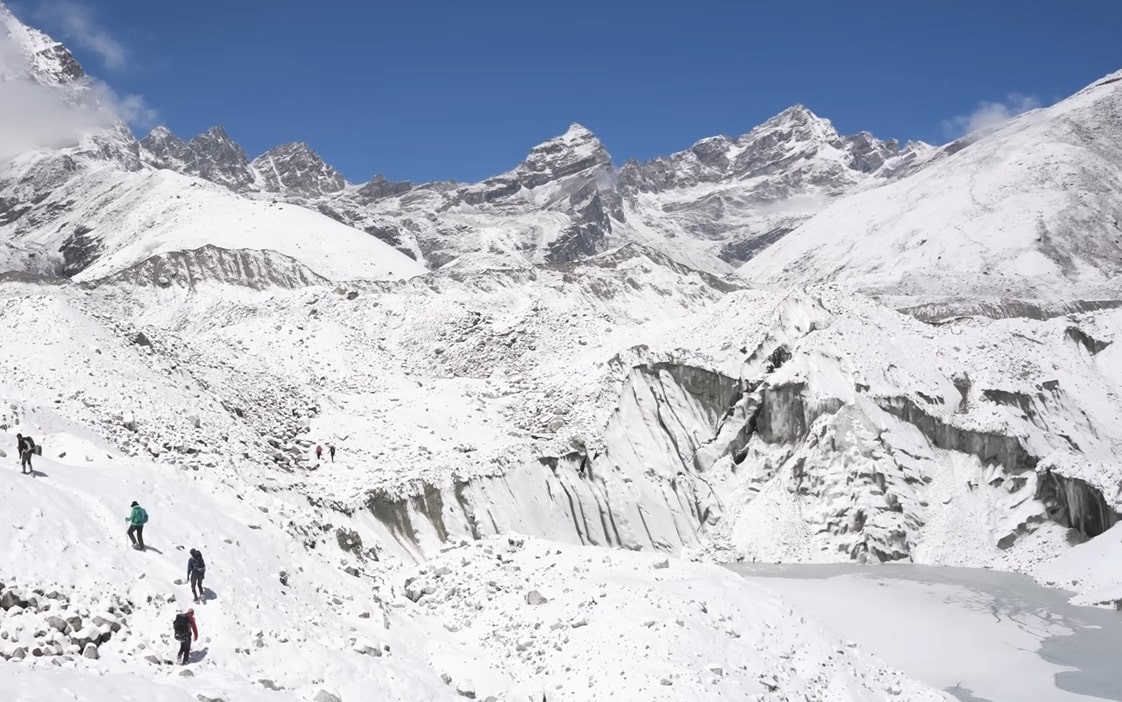
The Everest Three Pass Budget Trek is a remarkable and adventurous trek that takes you on an extraordinary journey through the heart of the Khumbu region in Nepal. This trek is designed for those seeking a challenge, offering the chance to conquer not just the Everest Base Camp but also three high-altitude passes: Kongma La Pass, Cho La Pass, and Renjo La Pass. These passes provide stunning panoramic views of the world's highest peaks, including Mount Everest, Lhotse, Makalu, and Cho Oyu. A true test of endurance and strength, this trek offers the perfect balance of natural beauty, cultural exploration, and physical challenge.
The trek begins with a scenic flight to Lukla, followed by a gradual ascent to some of the most iconic destinations in the Everest region. Trekking through traditional Sherpa villages, ancient monasteries, and alpine forests, you'll experience both the natural beauty and the rich cultural heritage of the Khumbu region. The Everest Three Pass Trek not only takes trekkers to Everest Base Camp but also introduces them to the less-trodden trails, offering a unique perspective of the majestic Himalayas.
Listen, the Three Pass Trek is brutal no matter when you go. You're crossing three 5,000m+ passes in two weeks. But timing matters—a lot. Pick the wrong season and you're dealing with waist-deep snow, zero visibility, or getting stranded by weather.
This is when most people go, and for good reason.
Weather patterns: Temperatures warm up as you move from March into May. At lower elevations like Namche (3,440m), daytime temps hit 10-15°C. Up at the passes (5,300-5,500m), you're looking at -5 to -10°C during the day, colder at night.
What's good about spring:
The downsides:
Specific month breakdown:
Late March: Still a bit cold, some snow at high passes, fewer crowds. Good if you want more solitude.
April: Peak season. Perfect weather, maximum visibility, but also maximum trekkers. Lodges get crowded—your guide needs to book ahead.
May: Getting warmer, which is nice at altitude but also means afternoon clouds build up faster. More challenging to get clear views. Pre-monsoon storms start appearing late in the month.
Personal take: If you can swing it, late March or very early April gives you the best balance of good weather and fewer people.
Most experienced trekkers prefer autumn, and I agree.
Weather patterns: Fresh after monsoon, air is incredibly clear. September still has some moisture, but by October-November you get crystal-clear skies. Temperatures similar to spring—comfortable at lower elevations, cold but manageable at passes.
What's good about autumn:
The downsides:
Specific month breakdown:
Late September: Monsoon just ended, trails can still be muddy in lower sections. Some residual clouds. But crowds haven't peaked yet—good sweet spot.
October: Absolute best weather. Clearest skies. Also most expensive and most crowded. Lodges at passes need to be booked or you might not get a bed.
November: Still excellent weather early in month, but gets progressively colder. By late November, nighttime temps at passes drop to -15 to -20°C. Snow starts accumulating. Fewer trekkers though.
Personal take: Early to mid-October is perfect if you can handle crowds. Late September if you want slightly fewer people but still great weather.
Real talk: this is tough. Not recommended for most people, especially on a budget trek where you're not carrying specialized gear.
Weather reality: Cold. Like, really cold. Daytime temps at lower elevations hover around 0-5°C. At the passes, you're looking at -15 to -25°C during the day, -30°C at night.
What's challenging:
But there are advantages:
If you're considering winter:
Personal take: Unless you're experienced with high-altitude winter conditions and have proper gear, skip this season. The Three Pass Trek is hard enough without adding extreme cold.
I'll be blunt: don't do the Three Pass Trek during monsoon.
Why it's a bad idea:
The only "advantages":
But none of that matters when you can't see the mountains you came to see, you're soaking wet, and trail conditions are dangerous.
Some budget companies offer monsoon treks at steep discounts. It's a bad deal. You're not saving money if the experience sucks.
Personal take: Hard pass. Wait for autumn or spring.
Best overall time: First two weeks of October or last two weeks of April
Best for fewer crowds: Late March or late September
Best for crystal-clear views: October (accept the crowds)
Best for comfortable temperatures: April
Avoid: June, July, August, late November through February
Remember, the Three Pass Trek crosses Renjo La (5,360m), Cho La (5,420m), and Kongma La (5,535m). Weather at those altitudes is serious business. Pick your season wisely.
Trekking permits in Nepal can be confusing. Here's exactly what you need, what it costs, and how to get it.
What it's for: The entire Everest region sits inside Sagarmatha National Park. This permit is mandatory for everyone.
Where to get it:
Getting it in Monjo is actually more convenient—you'll pass right through there on Day 2 or 3 of trekking. The office is open during trekking season and the process takes 10 minutes.
What you need:
Your trekking company should handle this, but good to know the details.
What it's for: This is a local community permit. Money goes toward infrastructure, schools, and conservation in the Khumbu region.
Where to get it: Same places as the National Park permit—either Kathmandu or Monjo checkpoint.
This permit was introduced in 2018 and some older guidebooks don't mention it, but it's mandatory now. Rangers will check for it.
Here's where it gets slightly complicated.
What it's for: Tracking system so authorities know who's on the trails. Helps with search and rescue if someone goes missing.
BUT—and this is important: As of 2023, TIMS cards are NOT required for Everest region if you're trekking with a licensed guide and have the other two permits.
The system is in flux. Some sources say TIMS is still needed, some say it's been replaced by the municipal permit.
Reality check: Your trekking company will clarify current requirements. If they say you need TIMS, get it. If they say you don't, trust them (assuming they're reputable).
This is what Explore Holiday Treks do. You provide:
We handle all paperwork and get permits before the trek starts or at checkpoints along the way.
Rangers check permits at several points:
Keep your permits with you at all times. Some trekkers laminate them or keep them in waterproof pouches.
What happens if you don't have proper permits: Rangers can turn you back or issue fines. Not worth risking.
The Three Pass route goes through some side valleys (Gokyo, Chhukung) where there are occasional permit checks. Make sure you have everything in order.
Some trekkers try to save money by skipping permits. This is:
Explore Holiday Treks includes:
Red flags with other companies:
While not a trekking permit, you'll need proof of travel insurance at several points. Some lodges ask to see it, and if you need emergency evacuation, rescue companies require it.
Your insurance must cover:
Keep a copy on your phone and a printed copy with your permits.
Look, I could fill this section with generic marketing language about "commitment to excellence" and "unforgettable experiences." Instead, here's what actually matters.
We're a Kathmandu-based trekking company that's been running budget treks since 2016. Not the biggest company, not the fanciest, but we know the Everest region inside out because our team is from there.
Company size: 8 full-time staff, 20+ guides and porters we work with regularly
Annual treks: About 150-200 treks per year across all routes
Specialization: Budget and mid-range trrekking (we don't do luxury lodges or helicopter returns)
All guides working Three Pass Trek have:
Most of our guides are from Solukhumbu district (where Everest is) or neighboring regions. They grew up in mountains, know the culture, and have personal relationships with lodge owners throughout the route.
This matters because:
Industry standard (that many companies ignore): 30kg per porter Our maximum: 25kg per porter
We also provide:
Some budget companies undercut prices by exploiting porters. We don't. If that makes us $100 more expensive, we're fine with that.
Maximum group size: 8 trekkers Average group size: 4-6 trekkers
Why this matters for Three Pass Trek:
Solo trekkers pay more ($1,400-1,500) because costs don't split, but we accommodate them.
Every guide has:
We've never had to use helicopter evacuation on a Three Pass Trek (knock on wood), but we have established relationships with three helicopter companies and know the procedures.
Some companies offer "12-day Three Pass Trek" or other rushed itineraries. These are dangerous.
Our standard itinerary: 19-21 days including:
Can we shorten it? Technically yes, but we don't recommend it. The passes are at 5,300-5,500m. Rushing increases altitude sickness risk significantly.
The Three Pass Trek is weather-dependent. If a pass is closed due to snow or storm, we adjust:
We don't: Push groups to cross passes in unsafe conditions just to stick to schedule.
Your safety beats your itinerary every time.
When you arrive:
Gear rental costs:
We rent from reputable shops and inspect gear before giving it to you.
Response time: During peak season (October-November, April-May) we're sometimes slow responding to emails because we're managing multiple groups. We try to reply within 24 hours but occasionally it takes 48.
Website: Our website is functional but not fancy. We put resources into guides and safety equipment, not web designers.
Customization: We offer some itinerary flexibility but we're not a fully custom tour operator. We have set routes we know work well.
Luxury: If you want heated lodges, private rooms everywhere, Western food, and daily hot showers, we're not your company. We do budget and mid-range.
After the trek:
About 30% of our clients are repeat customers or referrals. That's the metric we actually care about.
1. Contact us: Email with your preferred dates and group size
2. We send: Detailed itinerary and exact pricing
3. Deposit: 25% to secure booking (bank transfer or credit card via secure payment link)
4. Final payment: Remaining 75% when you arrive in Kathmandu (cash USD or NPR, or card with 4% processing fee)
5. Briefing: Day before trek starts, we review everything
6. Trek starts: Usually day 2 after arrival (gives you rest day in Kathmandu)
Cancellation policy:
If YOU need to postpone due to illness or emergency, we'll work with you to reschedule.
Email:[email protected]
Phone/WhatsApp: 9779849816310
Office: Thamel, Kathmandu (we can meet in person if you're in town)
Typical response time: 12-24 hours
We're not the cheapest Three Pass Trek option (that would be going fully independent, which is not smart for this route).
We're not the most expensive (luxury lodges with helicopter return cost $3,000-5,000).
We're the "doing it properly without wasting money" option.
If that sounds right for you, let's talk.
Additional Resources:
Altitude sickness information: We provide detailed briefing, but read up beforehand at HACE/HAPE symptoms online
Packing list: We send comprehensive list after booking
Training recommendations: Start cardio training 2-3 months before. This trek is physically demanding.
Travel insurance: We can recommend companies that definitely cover Everest region high-altitude trekking
Questions? Seriously, ask anything. We'd rather answer 100 questions before you book than have problems during the trek.
Ready? Let's get you across those passes.
Top Blogs About Trekking in the Everest Region
Uncover the best blogs about trekking in the Everest region, featuring expert advice, detailed itineraries, personal experiences, and essential tips for adventurers looking to explore the Himalayas.
Top 5 Everest Trekking Packages
Where is Mount Everest? Discover the World’s Highest Peak
Top 9 Reasons to Go on Everest Base Camp Trek
Accommodation During Everest Base Camp Trek
Shower and Laundry Facilities During the Everest Base Camp Trek
Elevation Facts for Everest Base Camp Trekking
Physical Fitness Requirements for Everest Base Camp Trek
The Best Ways to Trek to Everest Base Camp
When is the Best Time to Hike to Everest Base Camp?
Everest Base Camp Trek: Tips and FAQs
Why Sleeping at Everest Base Camp Is the Ultimate Trekking Experience ?
Which is the Better Lake Trek in Nepal: Gokyo or Tilicho Lake Trek?
Altitude Sickness on Nepal Treks: Symptoms, Treatment, and When to Descend (Complete Guide)
Everest Base Camp Toilet Problem: The Environmental Crisis on the World's Highest Mountain
Monastery Life in Nepal: Finding Peace in the Heart of the Himalayas
Altitude Sickness on Nepal Treks: Symptoms, Treatment, and When to Descend (Complete Guide)
Dal Bhat Power 24 Hour: The Science and Soul Behind Nepal's Mountain Fuel
10 Essential Everest Trekking Tips Every First-Time Trekker Must Know
The 3 AM Wake-Up Call Nobody Tells You About: Real Stories from Everest Base Camp
Solo Female Trekking in Nepal: A Complete Safety and Empowerment Guide for 2026
Complete Fitness Training Guide for Nepal Trekking 2026: From Couch to Base Camp in 12 Weeks
Physical Preparation: The Everest Three Pass Budget Trek is a physically demanding journey, involving long days of trekking, challenging terrain, and high altitudes. It is essential to be in good physical condition and have prior trekking experience. Training for stamina, endurance, and high-altitude hiking is highly recommended to ensure you are prepared for the trek.
Acclimatization: Acclimatization is critical to avoid altitude sickness. The trek includes scheduled rest days in places like Namche Bazaar, Dingboche, and Gokyo to help your body adjust to the increasing altitude. It's crucial to follow the pace set by your guide and avoid rushing the trek to ensure your safety.
Weather and Timing: The best time to trek is during the spring (March-May) and autumn (September-November) seasons, when the weather is more stable and the views are clear. Trekking during the monsoon or winter months can be dangerous due to unpredictable weather and snow accumulation.
Guides and Porters: Explore Holiday Nepal provides professional, experienced guides and porters who ensure your safety and comfort throughout the trek. They are trained in first aid and know the route well, making your journey smoother and more enjoyable.
Packing and Gear: Proper trekking gear is essential for a comfortable trek, especially warm clothing, good trekking boots, a reliable sleeping bag, and a waterproof jacket. Don’t forget essentials like a water bottle, sunscreen, and a hat. It's advised to pack light but bring enough layers to handle the cold temperatures at higher altitudes.
Communication and Safety: While communication in the Everest region may be limited, there are areas where Wi-Fi and phone signals are available. For emergencies, satellite phones and safety protocols are in place, ensuring quick assistance if needed.
Environmental Responsibility: It’s important to respect the local environment and culture during your trek. Follow the "Leave No Trace" principles to minimize your environmental impact, and be mindful of local customs and traditions in the villages you visit.
Insurance: Comprehensive travel insurance that covers high-altitude trekking, emergency evacuation, and medical costs is mandatory for this trek. Please ensure your insurance is valid for trekking up to 5,500 meters.
By choosing Explore Holiday Nepal, you are guaranteed a well-organized, safe, and memorable experience on the Everest Three Pass Budget Trek, with all logistical support and expert guidance provided for your journey.
The journey begins with an early morning flight from Kathmandu to Lukla, one of the most thrilling flights in the world. The Tenzing-Hillary Airport in Lukla, situated at 2,820 meters, marks the gateway to the Everest region. Upon landing, you will be greeted by your trekking crew from Explore Holiday Nepal, and after a brief rest, you’ll begin your trek towards Phakding. The trek to Phakding is relatively short, taking about 4 hours, and it offers trekkers a chance to begin adjusting to the altitude while enjoying views of the surrounding mountains and forests. The trail meanders along the Dudh Koshi River, passing through small Sherpa villages and offering a glimpse of local life. Phakding, a small village at 2,645 meters, will be your stop for the night. Here, you’ll stay in a teahouse and enjoy the first night in the Himalayas, with simple accommodations and meals.
Trek from Phakding to Namche Bazaar takes approximately 6 hours. This is a longer and more challenging section of the trek, but it offers an exciting opportunity to experience the dramatic landscapes of the Everest region. The trail ascends gradually, crossing multiple suspension bridges over the Dudh Koshi River, and winds its way through pine forests. As you get closer to Namche Bazaar, the trail becomes steeper, but the effort is rewarded with spectacular views of snow-capped peaks like Everest, Lhotse, and Nuptse. Namche Bazaar, the bustling Sherpa capital, lies at 3,440 meters, and it’s an important cultural and commercial hub for trekkers. In Namche, you will find a variety of shops, cafes, and accommodations, along with incredible views of the surrounding mountains. This will be the first major stop where trekkers can enjoy a comfortable night’s rest.
Day 3 is an acclimatization day in Namche Bazaar. Proper acclimatization is crucial to prevent altitude sickness as you ascend further into the Himalayas. Explore Holiday Nepal provides a scenic hike to help with this process, often to the nearby Everest View Hotel or the Syangboche Airstrip. This short hike offers panoramic views of Everest, Lhotse, Ama Dablam, and other peaks, helping you adjust to the increasing altitude while enjoying the stunning Himalayan landscape. The rest of the day can be spent exploring Namche, visiting the local markets, or relaxing and preparing for the trek ahead. Taking it easy today ensures that you are well-prepared for the more challenging days to come.
You will trek from Namche Bazaar to Tengboche, a journey that typically takes around 5 hours. The trail descends into the Dudh Koshi River Valley before climbing up to the village of Tengboche, home to the famous Tengboche Monastery. The monastery, perched at an altitude of 3,867 meters, is one of the most important religious sites for the Sherpa people. Along the way, trekkers pass through forests of pine and rhododendron, offering an opportunity to see local wildlife, including the Himalayan tahr and the musk deer. Upon reaching Tengboche, the stunning views of Mount Everest, Lhotse, and Ama Dablam become even more impressive. The overnight stay in Tengboche offers an opportunity to visit the monastery, and trekkers can experience the peaceful atmosphere of this sacred site.
The trek from Tengboche to Dingboche takes around 5 hours. The trail today is relatively moderate, offering scenic views as you ascend into the higher Khumbu Valley. You will pass through small villages, including Dibuche and Pangboche, before reaching Dingboche, which sits at 4,340 meters. Dingboche is a picturesque village surrounded by fields of barley, potatoes, and buckwheat. The area also offers stunning views of the surrounding peaks, including Island Peak and Ama Dablam. This is an important stop for acclimatization, as Dingboche lies at a high altitude, and it’s necessary to take it slow and hydrate properly. In the evening, trekkers can relax and enjoy the peaceful setting of Dingboche.
Day 6 is another acclimatization day. This day is important for allowing your body to adjust to the high altitude before continuing the ascent. Explore Holiday Nepal suggests a short excursion to the nearby Nangkartshang Hill for an additional acclimatization hike. This hike will take a few hours and provides amazing views of the Lhotse, Makalu, and Island Peak. After the hike, you can spend the rest of the day in Dingboche resting and preparing for the upcoming trekking days. It’s also an opportunity to explore the village, meet locals, and enjoy the tranquil Himalayan atmosphere.
The trek from Dingboche to Chukung is relatively short, taking about 4 hours. Chukung, located at an altitude of 4,740 meters, is a small village that serves as the base camp for those planning to climb Island Peak. The trail to Chukung offers excellent views of the surrounding peaks, including Ama Dablam, Lhotse, and Island Peak itself. Chukung is a peaceful place with a few teahouses where trekkers can rest before embarking on the higher passes. It also provides an excellent viewpoint for photography. After arriving, trekkers can relax and enjoy the serenity of this remote location.
Day 8 is one of the most demanding days of the trek, as you will be crossing Kongma La Pass, which reaches an altitude of 5,535 meters. The journey from Chukung to Lobuche, which takes about 8 hours, requires navigating through rugged terrain and steep ascents. After reaching the pass, trekkers are rewarded with sweeping views of Makalu, Lhotse, and Everest. The descent from the pass to Lobuche is long but manageable, and upon reaching Lobuche (4,960 meters), you will have a chance to rest and enjoy the high-altitude environment. Lobuche is a small, but essential stop on the route to Everest Base Camp, providing a comfortable overnight rest.
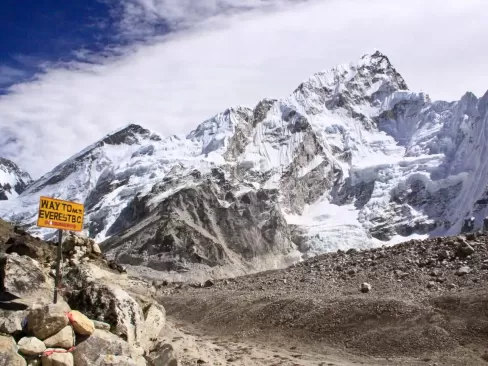
Day 9 is the day you will reach the legendary Everest Base Camp. Starting early, the trek from Lobuche to Base Camp takes around 6 hours, passing through Gorakshep and then continuing to the base of Mount Everest. The final push to Base Camp offers fantastic views of Everest’s south face, and standing at 5,364 meters will feel like the pinnacle of your journey. After spending some time at Everest Base Camp, soaking in the extraordinary views and the sense of achievement, you will trek back to Gorakshep (5,160 meters) for an overnight stay. The high altitude can make this a tiring day, but the thrill of reaching Everest Base Camp is unmatched.
Early morning ascent to Kalapathar, the famous viewpoint known for its panoramic views of Mount Everest, Lhotse, and the surrounding peaks. The hike to Kalapathar is steep but rewarding, taking about 2 to 3 hours. After savoring the breathtaking sunrise and views from the summit of Kalapathar, you will descend to Gorakshep for a quick rest before continuing your trek towards Dzongla, located at 4,750 meters. The trek from Gorakshep to Dzongla is approximately 4-5 hours, passing through rugged landscapes and offering stunning views of the Khumbu Glacier and surrounding peaks.
Day 12 is a shorter day of trekking, taking about 4 hours to reach Gokyo Lake at 4,800 meters. Gokyo is one of the most beautiful and serene locations in the Everest region, and the trek here provides a calm respite from the more intense days of the trek. The turquoise waters of Gokyo Lake, set against the backdrop of towering mountains, create an unforgettable setting. After reaching Gokyo, you can relax and enjoy the tranquility of this remote location.
Day 13 is a rest day at Gokyo to allow further acclimatization. You have the option to hike to Gokyo Ri, a peak that offers one of the best panoramic views in the Everest region. From the summit of Gokyo Ri, you can see Everest, Makalu, Cho Oyu, Lhotse, and the stunning Gokyo Lakes below. The hike to Gokyo Ri takes around 3-4 hours, and it’s well worth the effort for the incredible vistas. After the hike, you can return to Gokyo and rest for the day.
Day 14 is another challenging day as you trek from Gokyo to Lungden, passing over Renjo-La Pass at 5,360 meters. The trek to Renjo-La involves steep ascents and breathtaking views of the surrounding peaks. After crossing the pass, you will descend to Lungden, a small village located at 4,340 meters. The trek takes about 7 hours, and the stunning scenery along the way makes it a memorable day.
Trek from Lungden to Thame Village, which takes around 6 hours. Thame is a beautiful Sherpa village with a rich cultural history, and it provides an opportunity to experience the local way of life. The trail takes you through forests and past traditional stone houses, and as you approach Thame, you’ll enjoy views of Kongde Ri and Thamserku.
You’ll trek from Thame to Namche Bazaar, which takes about 4 hours. The route is mostly downhill, and you’ll pass through forests, cross suspension bridges, and descend into the Dudh Koshi River valley. Upon reaching Namche, you can relax and enjoy the familiar sights of this bustling village.
Day 17 is the final stretch of your trek, taking you from Namche Bazaar back to Lukla. The trek will take about 7 hours, passing through familiar villages and beautiful forests along the way. This marks the end of the trekking portion, and you can enjoy your last night in the Khumbu region, reflecting on the journey’s achievements.
On the final day of the trek, you’ll fly from Lukla back to Kathmandu. Due to the unpredictability of flights from Lukla, some flights may be diverted to Manthali Airport (Ramechap), from where you’ll drive back to Kathmandu. The drive takes around 5 hours, giving you time to relax and reflect on your incredible journey across the Everest region. Upon reaching Kathmandu, your Everest Three Pass Budget Trek concludes, and you’ll have the chance to enjoy some well-deserved rest.
Your Start Date is the day you land in Nepal, and your End Date is when you fly home.
If the set Everest Three Pass Budget Trek group dates don’t suit your schedule, we can offer alternative dates upon request.
The Everest Three Pass Budget Trek is a challenging and adventurous trekking route in the Everest region, designed to take you through three high-altitude passes: Kongma La Pass (5,535 meters), Cho-La Pass (5,420 meters), and Renjo-La Pass (5,360 meters). This trek offers an exceptional opportunity to witness breathtaking views of the world’s highest peaks, including Mount Everest, Lhotse, Makalu, and Cho Oyu, while exploring remote Sherpa villages and Everest Base Camp. The budget-friendly aspect means that you’ll stay in teahouses along the route, minimizing costs without compromising the experience. The trek is ideal for those looking for a more adventurous, off-the-beaten-path experience, with plenty of opportunities for acclimatization.
The Everest Three Pass Trek is considered to be a strenuous and physically demanding trek, suitable for trekkers with prior experience in high-altitude hiking. The difficulty comes from the high-altitude passes, long trekking days, and the need for acclimatization. While the overall elevation gain can be taxing, proper acclimatization and preparation are key factors to ensure a safe journey. The trek involves ascents and descents across varied terrain, with some challenging sections, particularly when crossing the three high passes. However, Explore Holiday Nepal offers professional guides who will help you manage the pace and offer support throughout the journey.
The Everest Three Pass Budget Trek is suitable for trekkers who are in good physical condition and have prior experience with multi-day treks. The trek involves long days of hiking, sometimes up steep inclines and across rugged terrain, so being physically prepared is important. Regular aerobic exercises, such as hiking, running, or cycling, will help build stamina. It is also essential to train for altitude by hiking at high elevations before the trek. If you're not an experienced trekker, it's still possible to enjoy the trek, but a fitness regimen prior to the trip is recommended. Trekking with Explore Holiday Nepal will provide you with professional guidance to ensure a safe and enjoyable experience.
Yes, altitude sickness is a concern for all trekkers in the Everest region, especially when trekking at elevations above 3,000 meters. The Everest Three Pass Trek involves several high-altitude areas, including the three passes over 5,000 meters. To avoid altitude sickness, Explore Holiday Nepal takes extra care in planning acclimatization days, such as in Namche Bazaar, Dingboche, and Gokyo, where you can adjust to the higher elevations. It is important to listen to your body and take rest days as recommended. Drinking plenty of water, avoiding alcohol, and taking it slow are key strategies to mitigate the risks of altitude sickness.
The Everest Three Pass Budget Trek usually takes around 18 days, with a well-paced itinerary designed for proper acclimatization. The trek begins with a flight to Lukla, followed by several days of trekking through villages like Phakding, Namche Bazaar, Tengboche, Dingboche, and Chukung, before reaching Everest Base Camp. The trek then continues across the three passes (Kongma La, Cho-La, and Renjo-La) to Gokyo Lake, Lungden, and Thame. The trek ends with a return journey to Lukla and a flight back to Kathmandu. Explore Holiday Nepal will provide a detailed day-by-day itinerary, ensuring a well-organized trip with time for rest and acclimatization.
The best time to undertake the Everest Three Pass Budget Trek is during the pre-monsoon (spring) season from March to May and the post-monsoon (autumn) season from September to November. These months offer the most favorable weather conditions, with clear skies and stable temperatures, making trekking conditions more comfortable. The spring season offers the added benefit of rhododendron blooms, while autumn provides clear views of the surrounding peaks. It is advisable to avoid trekking during the winter months (December to February) as temperatures can be extremely cold, and some passes may be blocked by snow. The summer monsoon months (June to August) are also not ideal due to heavy rainfall and the risk of landslides.
To trek in the Everest region, you will need the following permits:
Sagarmatha National Park Permit: This permit is required for entry into the Everest region and is available at the Monument Gate in Monjo or at the National Park Office in Kathmandu.
TIMS (Trekkers' Information Management System) Card: This card helps track trekkers' movement in the region for safety and emergency purposes. It is mandatory for all trekkers. Explore Holiday Nepal will assist in arranging all necessary permits for you to ensure a smooth and hassle-free trekking experience.
Booking the Everest Three Pass Budget Trek with Explore Holiday Nepal is easy. You can contact us via email or phone to inquire about available dates and itineraries. We will provide all necessary details about the trek, including permits, accommodation, and costs. Once you confirm your booking, we will handle the logistics, including permits, transportation, and guide arrangements. Our professional team will ensure that you have a safe and memorable trekking experience from start to finish.
Accommodation during the Everest Three Pass Budget Trek is provided in teahouses, which are simple lodges offering basic amenities. In these teahouses, you’ll have a warm, comfortable bed, shared bathrooms, and the chance to interact with the local Sherpa communities. While the accommodation is basic, they provide a cozy atmosphere with a chance to relax after a long day of trekking. The teahouses also serve delicious local meals, such as dal bhat (lentil soup with rice), noodles, and other Western and Nepali dishes. Rooms typically come with a blanket, but it’s recommended to carry your own sleeping bag for extra warmth, especially at higher altitudes.
Food on the Everest Three Pass Trek consists mostly of local Nepali dishes served in teahouses along the trail. The staple food is dal bhat (lentil soup with rice), which provides energy for long days of trekking. You will also find a variety of other meals, including momos (dumplings), noodles, pancakes, porridge, and some Western-style dishes like spaghetti, eggs, and toast. As you ascend higher, the food options become simpler, but the quality remains sufficient to fuel your trek. For a more varied diet, snacks like energy bars, nuts, and chocolates can be purchased along the way. It’s important to keep in mind that food prices increase as you ascend due to the remoteness of the area.
| No of people | Price per person |
|---|---|
| 1 - 1 | $999 |
| 2 - 5 | $799 |
| 6 - 9 | $789 |
| 16 - 20 | $769 |

| No of people | Price per person |
|---|---|
| 1 - 1 | $1,355 |
| 2 - 5 | $1,299 |
| 6 - 9 | $1,280 |
| 10 - 15 | $1,265 |
| 16 - 20 | $1,250 |


 (38)
(38)  100% recommend (56)
 (34)
(34) 


